
Geoida
Help
|
|
Geoida |
Geoid-Spheroid Separation |
The requirement to extract geoid-spheroid separation (N) values depends on the configuration of a job and the type of computation to be made.
If the job is configured with both ellipsoidal horizontal and ellipsoidal vertical datums, it may be required to simply determine N-values for individual or multiple points only for reporting or listing purposes. In this case, the Apply to obs check box in Job Configuration would be uncrossed to indicate that no correction for geoid-spheroid separation is to be applied.

|
Where it is required to compute projection or geographic coordinates for observed points, the field observations must be reduced to the spheroid, and if the height components are related to a geoidal (or orthometric spirit levelled, gravimetric reference surface such as mean sea level) vertical datum, then it will normally be necessary to correct for the geoid-spheroid separation to maintain correctness and accuracy.
So, if the vertical datum is a geoidal datum, then N-values should be involved in the observation reduction processes when coordinating points, particularly if there is a significant separation between the geoidal and ellipsoidal surfaces. To ensure that the geoid-spheroid separation is accounted for, the Apply to obs check box in Job Configuration must be crossed in order to incorporate the necessary correction into the reductions.
Sections
|
Models
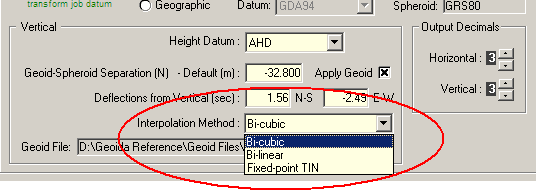
A geoid model is required before N-values can be extracted, and the type of model is determined by the Interpolation Method in Job Configuration.
|
There are two types of model.
|
WARNING |
When entering geoid-spheroid separation data it is of vital importance that it applies to the correct spheroid. Permanent mark summary sheets may show horizontal and vertical details for more than one datum and spheroid. It is vital that the values for the correct datum and spheroid be used or errors will result. |
The display of the current geoid model is controlled by the Geoid model checkbox in Display Settings - refer to this topic for more information.
Choice of interpolation method
Bicubic grid interpolation is the best method to use by reason of it being the most accurate method; it should be the method of choice wherever possible and is suitable for large or small areas. The bilinear grid method is less accurate but is used in the bicubic grid method at grid corners and edges. The triangle method is suitable for smaller areas when a grid model is not available but the geoid values for control points are already known. With a triangle model care should be taken if geoid values are extrapolated for points outside the model area.
Grid-file interpolation method
Interpolation of geoid and deflection values from a grid-file model may use either of the bicubic or bilinear methods.
| CAUTION - Ensure that the geoid grid-file selected in Job Configuration corresponds to current published data and matches the geodetic datum defined for the job. Using an inconsistent or out-of-date file may result in erroneous interpolations. |
Data file optimisation - Bilinear & bicubic interpolation
If Interpolation Method is set to Bilinear or Bicubic interpolation, one of the following optimisations may be applied, depending on the format of the gridded geoid data:
Usually the coverage of the data contained in a selected geoid data file will be far greater than is actually required for a job even of large extent. Geoida may therefore window the area of interest from the nominated geoid grid file based on the extent of the job plus a margin 2 times the grid interval. This reduces (usually by a considerable amount) the amount of data to scan during interpolation - this is an important feature of Geoida that attempts to keep at a minimum the amount of time taken to interpolate geoid data and is necessary because, unlike other ASCII text formats available, the Australian AusGeoid formats and the South African DAT format are not converted to binary files to maximise speed and efficiency.
To accomplish the best efficiency, the windowed data is re-written to a new file in the same format and named the same as the original file but with the current job name inserted to identify the original file and the job to which the new file relates. The Geoid File field in Job Configuration is then updated with the new file name and on a subsequent occasion when interpolation is required in a selected option, the windowed file will be used.
The windowed file has an extra header line inserted, beginning with the keyword 'GEOIDA_LOCAL_WINDOW', that records the name of the original grid file. If the job later increases in size by the addition of new points or by adjustment and it no longer "fits" the windowed file or it extends beyond the previously-windowed area, a new window of data will be extracted from the original geoid file and written to a new window file.
If the original geoid grid-file is small and not greater than 200kb in size, or if the windowed file is not a significant saving over the size of the original file (not less than 0.75 of the original file size), the windowed file will not be saved.
For more information about working with Australian AUSGeoid .DAT/.TXT or South African .DAT geoid files, refer to Interpolation tips below.
Note: In some ASCII text formats the data is stored from the southern-most edge of the coverage area increasing towards the north (latitude increasing northwards through the file) whereas other formats are recorded in the opposite direction, from northern-most with latitude decreasing southwards. Since the US-NGS binary (.BIN) format convention is southern-most first with latitude increasing northwards throughout the file, to account for some formats being recorded in the opposite direction, when Geoida re-writes the original data to the BIN format the number of rows in the header line is recorded as a negative number - this may be an issue if the Geoida-created BIN file is subsequently used in another software application.
Interpolation and data reduction
Direct interpolation of geoid-spheroid separation for individual or multiple points may be done at any time in a number of different ways once a model has been formed or is otherwise available. For individual points (i.e., one at a time) use the Interrogate Point option, the Modify function in List Points / Export option, or when creating new points (or provisional points for least-square adjustment) use the Digitise Provisional Points option. To interpolate for multiple points at once, use Interpolate Geoid values in Window.
When processing survey field observations, interpolation of N-value is made differently depending on the processing option to be used but is generally made in the following stages:
Note - Vertical gravitational deflections are available only from the Australian AUSGeoid .DAT/.TXT formats and are interpolated together with the undulations and applied to individual points, however the deflections are otherwise applied only to certain observation types in Least Squares Network Adjustment - refer to Corrections Applied.
Interpolation tips
The following tips apply only to the Australian AUSGeoid .DAT/.TXT or South African .DAT formats. All other formats are either binary formats or are ASCII text formats that Geoida will automatically convert to binary; binary files are handled differently by Geoida and do not require creation of windowed files.
GEOIDA_LOCAL_WINDOW,"D:\Geoida Reference\Geoid Files\SH50-14.dat",[NO_RESIZE]
SH50-14[NO_RESIZE].dat
| Converted from CHM to HTML with chm2web Standard 2.85 (unicode) |