
Geoida
Help
|
|
Geoida |
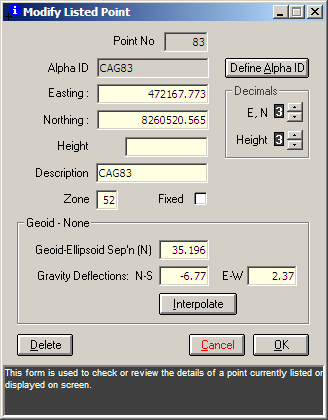
Interrogate Point |
Select this option if you wish to view or edit details for individual points within the database.
The prompt Select required point appears in the status bar prompt-panel and a boxed-cross-hair pointer appears on the screen - place the pointer around the required point and click the mouse to select it for display. If a number of points fall within the cursor outline, the point closest to the centre will be selected.
If the required point cannot be picked from a concentrated group of points, use Zoom Point Range to exclude the persistent points that mask the point required, or use List Points / Export to select the point by point-number and use the Modify function.
The Interrogate Point window displays the point in the coordinate type according to the Coordinate System selection in Job Configuration which defines how points are stored in the database.
|
|
More Info: |
When Geoida is running, details of the purpose and use of each control in this window will be displayed in the bottom panel when the mouse is passed over any active object. |
Convention for geographic coordinates
If point coordinates are displayed as geographic (latitudes and longitudes), the convention applied for entering or modifying the values (both here and otherwise throughout Geoida) is: south latitudes are -ve and north latitudes are +ve within the range -90 to +90 degrees; longitudes west of the Greenwich meridian (0 degrees) are -ve and east of Greenwich are +ve, range -180 to +180 degrees.
Geoid interpolation
The Interpolate button will normally be enabled if a geoid model exists unless the point is a fixed point, because it is expected that fixed points and their geoid-spheroid separation values will have been defined in the Enter Points option. If it is necessary to interpolate a new geoid-spheroid separation value for a fixed point from the model, un-cross the Fixed check-box which will then enable the Interpolate button, interpolate the new value, and then re-cross the Fixed check-box.
Define Alpha ID
As an alternative to using the Alpha-Numeric ID Cross-Reference option to define alpha point IDs and their point number cross-references, click the Define Alpha ID button to open the Alpha-Numeric Point ID Cross-Reference window and specify the alpha ID for the current point. Note that it is not necessary for every point to have an alpha ID - the field may be left blank if desired, but if there has already been an alpha ID defined in Alpha-Numeric ID Cross-Reference then it will be displayed here in the Alpha ID field.
Notes
Click OK to save or Cancel to discard any changes
made to the selected point - the box-shaped cursor will re-appear
to select another point as prompted. When Interrogate Point is no
longer required, press the keyboard Escape button or the
right mouse button to close the option; selecting another menu item
will also terminate this option.
An alternative modify function is contained within the List Points / Export option, and new points can be created quickly by clicking their approximate positions on-screen and then editing the coordinates, with the Digitise Provisional Points option.
| Converted from CHM to HTML with chm2web Standard 2.85 (unicode) |